
Apple TV Settings for the Classroom
/
You don’t have to live with Apple TV’s default settings. Let’s see what you can tweak to make Apple TV more classroom friendly. But first...
What’s an Apple TV? What is AirPlay?
Apple TV isn’t actually a television. It’s a $69 small black box with HDMI output. This post is for 2nd and 3rd Generation Apple TVs (the new Fourth Generation Apple TV runs a different operating system). Its output might go to a television, or it can just as easily go to a projector (like ones that display onto a SMART Board). If your projector doesn’t have and HDMI input, you can use an HDMI to VGA adapter like the Kanex ATVPRO.
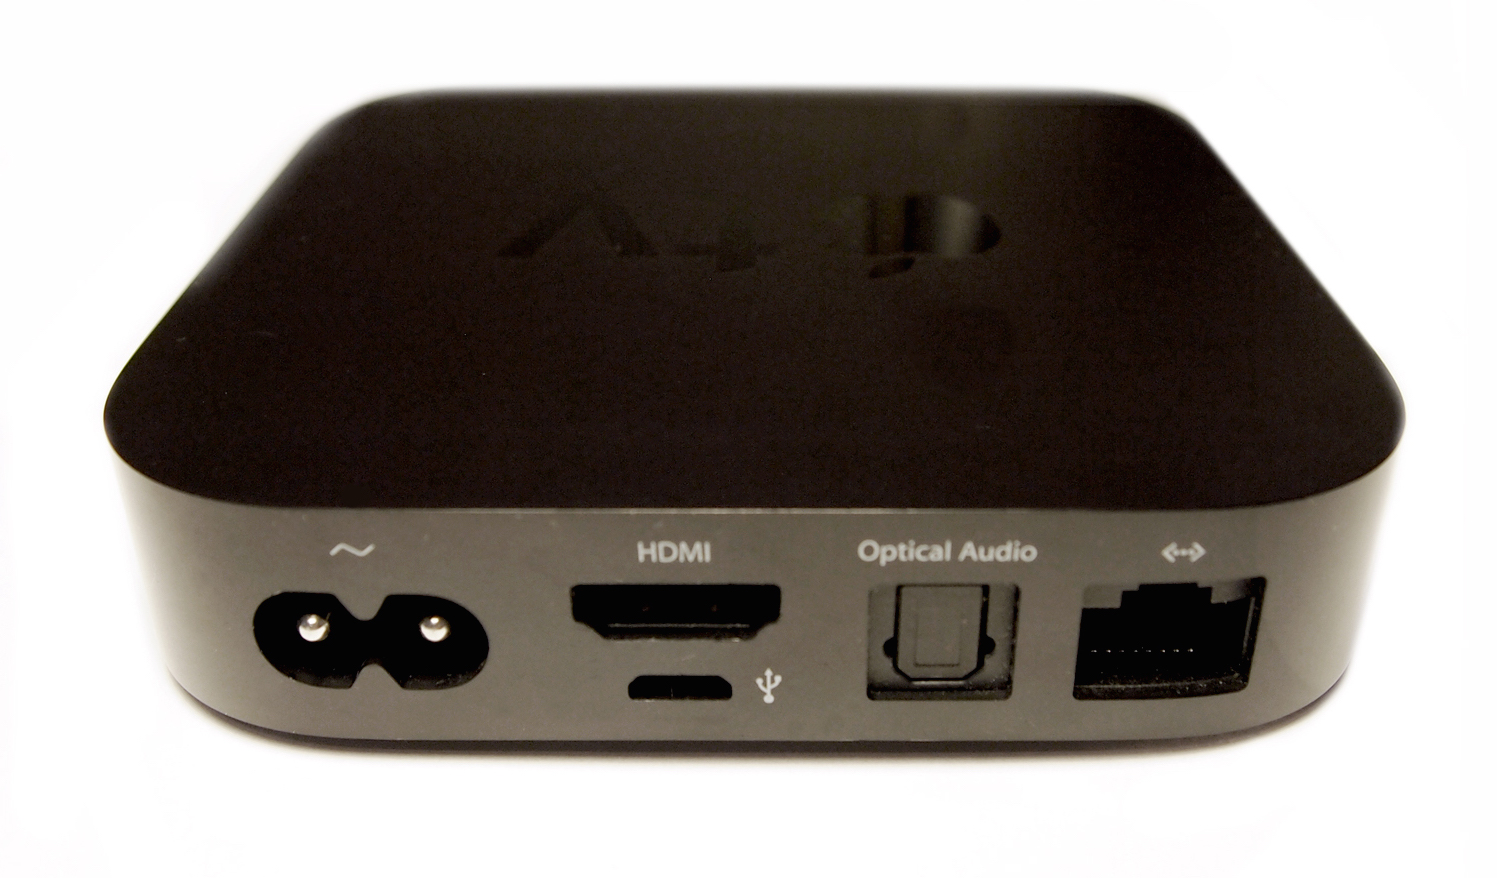
Creative Commons Licensed Image by Mikepanhu on Wikimedia.
If there’s an Apple TV in the classroom, it’s most likely used to mirror teacher and student iPads or MacBooks. There are plenty of other ways to display an iPad on a large screen, and Apple TV is one of the most popular because it has AirPlay. AirPlay is Apple’s technology that will stream a live view of whatever is on an iOS device's screen. This is why Apple TV is so popular. This mirroring ability through AirPlay is built into all iPads (except the first generation iPad) and all newer iPhones and iPod touches.

With iPad mirrored onto a large screen, teachers can demo how to use an app, zoom into maps, show what’s under iPad’s camera, display Kahoot questions, etc. Students can show off their latest creations, draw their solution to a problem, display their writing, etc. Read what Apple has to say about AirPlay.
Hide Those Troublesome Movie Previews
If you have an Apple TV in your classroom, you are very much aware that when nothing is being played or mirrored, Apple TV often shows movie poster artwork. Sometimes this artwork has images you’d rather not display in school. Even if all the images are tame, showing movie posters distracts students. I’ve had lessons get derailed simply because students got excited and started discussing the movie titles they saw appear on the screen.

In order to rid Apple TV’s home screen of those pesky movie posters, you’ll need to enable Restrictions. Do this in the Settings menu, selecting General, and choosing Restrictions. You’ll be prompted to enable Restrictions with a passcode. After you’ve done that, change Purchase & Rental to Hide.

Hide All Those Channels
While you cannot hide all of the channels you see on Apple TV’s home screen, you can make most of them disappear. I’m sure you have no need for The Tennis Channel, Crunchy Role, and ABC Family channels. You might not even need the YouTube channel because you can AirPlay that content from an iPad instead.
To hide channels, go to Apple TV’s Settings app. Choose Main Menu. Change each channel from Show to Hide.

Alternatively, you can hide an icon by using Apple TV’s remote to select an icon. Holding down the remote’s center button will cause the icon to jiggle. Press the Play/Pause button to bring up a menu where you can choose to hide that item.

This is what the Home screen looks like with All Main Menu & Purchase and Rental items hidden.
Rearrange Icons
You cannot rearrange the the top row of icons. If you hid all of the channels you are able to hide, you won’t be left with any icons you can rearrange. But if you didn’t hide all of the extra channels, you can rearrange them.
Rearrange the icons by highlighting one that you want to move. Next, press and hold the remote’s center button until the icon shakes. Use the arrow buttons to move the icon. Press the center button again to make that icon stop shaking and stay in place.

CREATIVE COMMONS LICENSED IMAGE BY Tree Frog on Wikimedia.
Use the Screen Saver as a Bulletin Board
While Apple TV’s default screen saver photographs are beautiful, you can use your own images for the screen saver. It’s like using the display connected to your Apple TV as a digital bulletin board!
I suggest adding an iCloud Photos album on your Mac, iPhone, or iPad titled Apple TV. After adding images to this album, go into Apple TV’s Settings app and choose Screen Saver. Choose iCloud Photos and your album that you titled Apple TV. Note that the option to to use iCloud Photos as the screen saver is not displayed if you have hidden iCloud Photos from the main menu.
It might be tricky using iCloud Photos if your iCloud account is different from the one used for the Apple TV. If this is the case, create a Flickr account and make an album for Apple TV. Select your Flickr account in Apple TV’s Screen Saver settings. Note that the option to to use Flickr as the screen saver is not displayed if you have hidden Flickr from the main menu.
After you have that iCloud Photos or Flickr account all set up in as the screen saver, you don’t have to do anything on Apple TV when you want to make changes. Simply add to or remove images from your iCloud Photos or Flickr album and those changes will be automatically made to Apple TV’s screen saver.
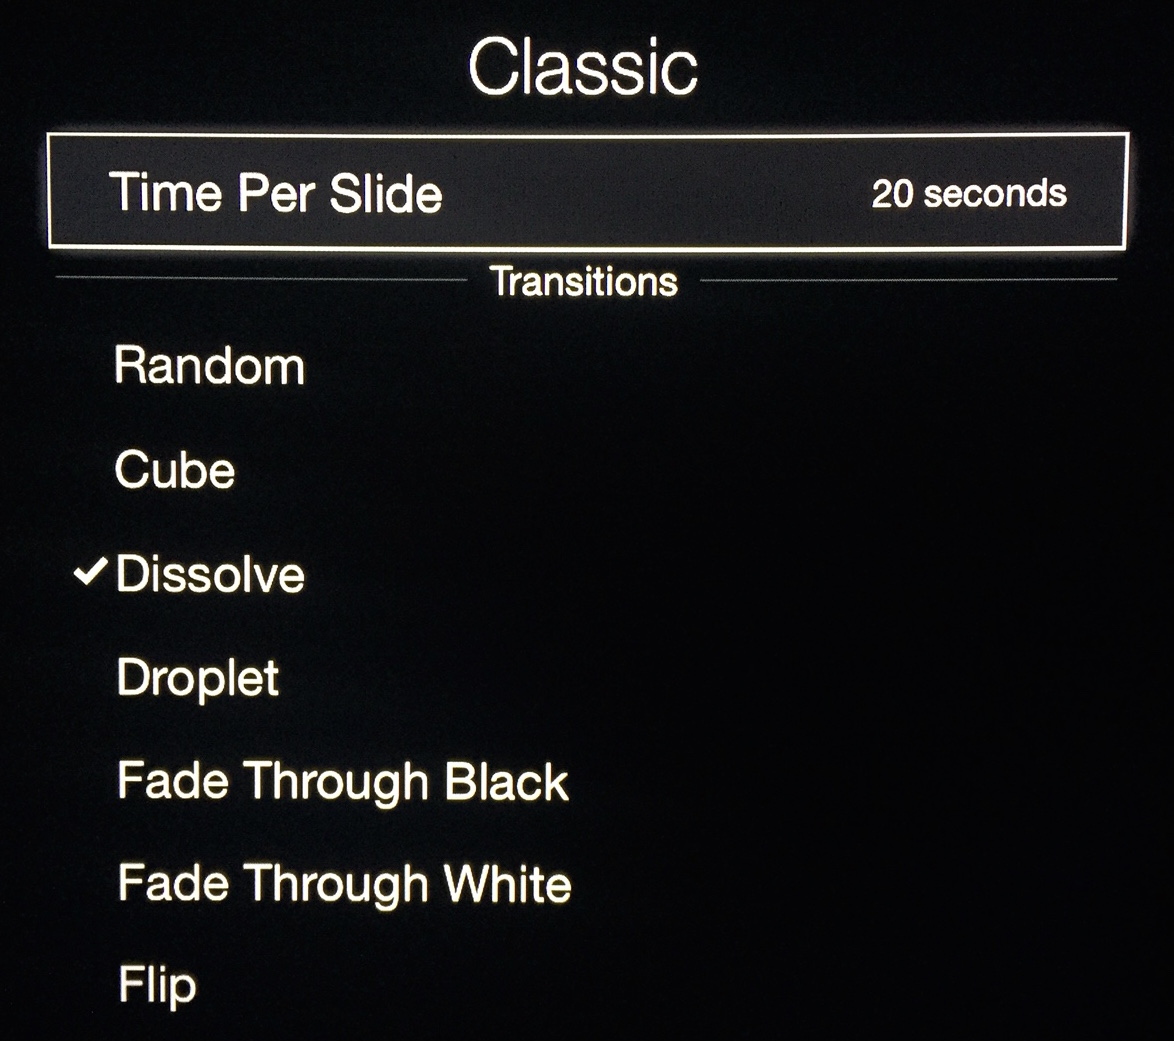
Also in the Screen Saver settings: you can set how long each image is displayed and how long it takes before the screen saver activates. I suggest you use the Classic style of screen saver. Classic displays each photo full screen. I like to keep things simple with a dissolve transition.
So what images might you want to display? For me, I would not put photos of students as the screen saver. You know how kids are: they freak out when they see photos of themselves or their friends. I don’t want my screen saver to be distracting. So instead, I would post educational content, which might include:
- images of anchor charts
- educational posters
- infopics
- vocabulary words with definitions
- digitized student work artwork
- important reminders
- due dates
- inspirational quotes
- writing prompts (John Spencer has some super Photo Prompts)
- any information you put on a PowerPoint/Keynote/Google Slide saved as an image
Rename the Apple TV
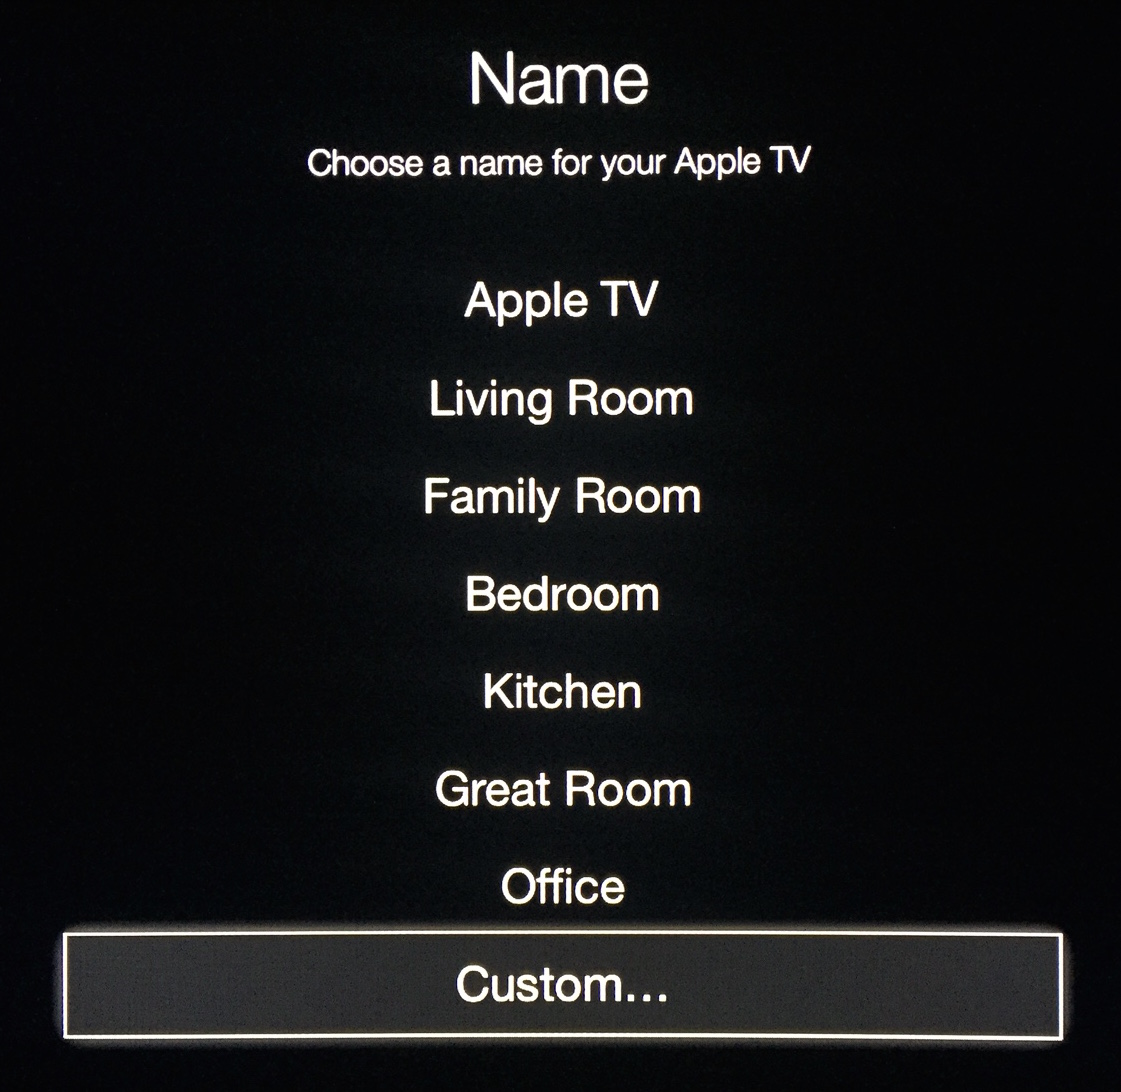
If there’s more than one Apple TV in your school, you’ll want to name the Apple TV so that it’s clear which room the Apple TV is in. To name an Apple TV, open Settings and choose AirPlay. Select Apple TV Name and choose Custom. Enter a new name. Because Apple TVs are listed in alphabetical order under an iPad’s or Mac’s AirPlay menu, I've known some teachers to begin their Apple TV's name with a symbol so theirs appears first.
Display AirPlay Instructions
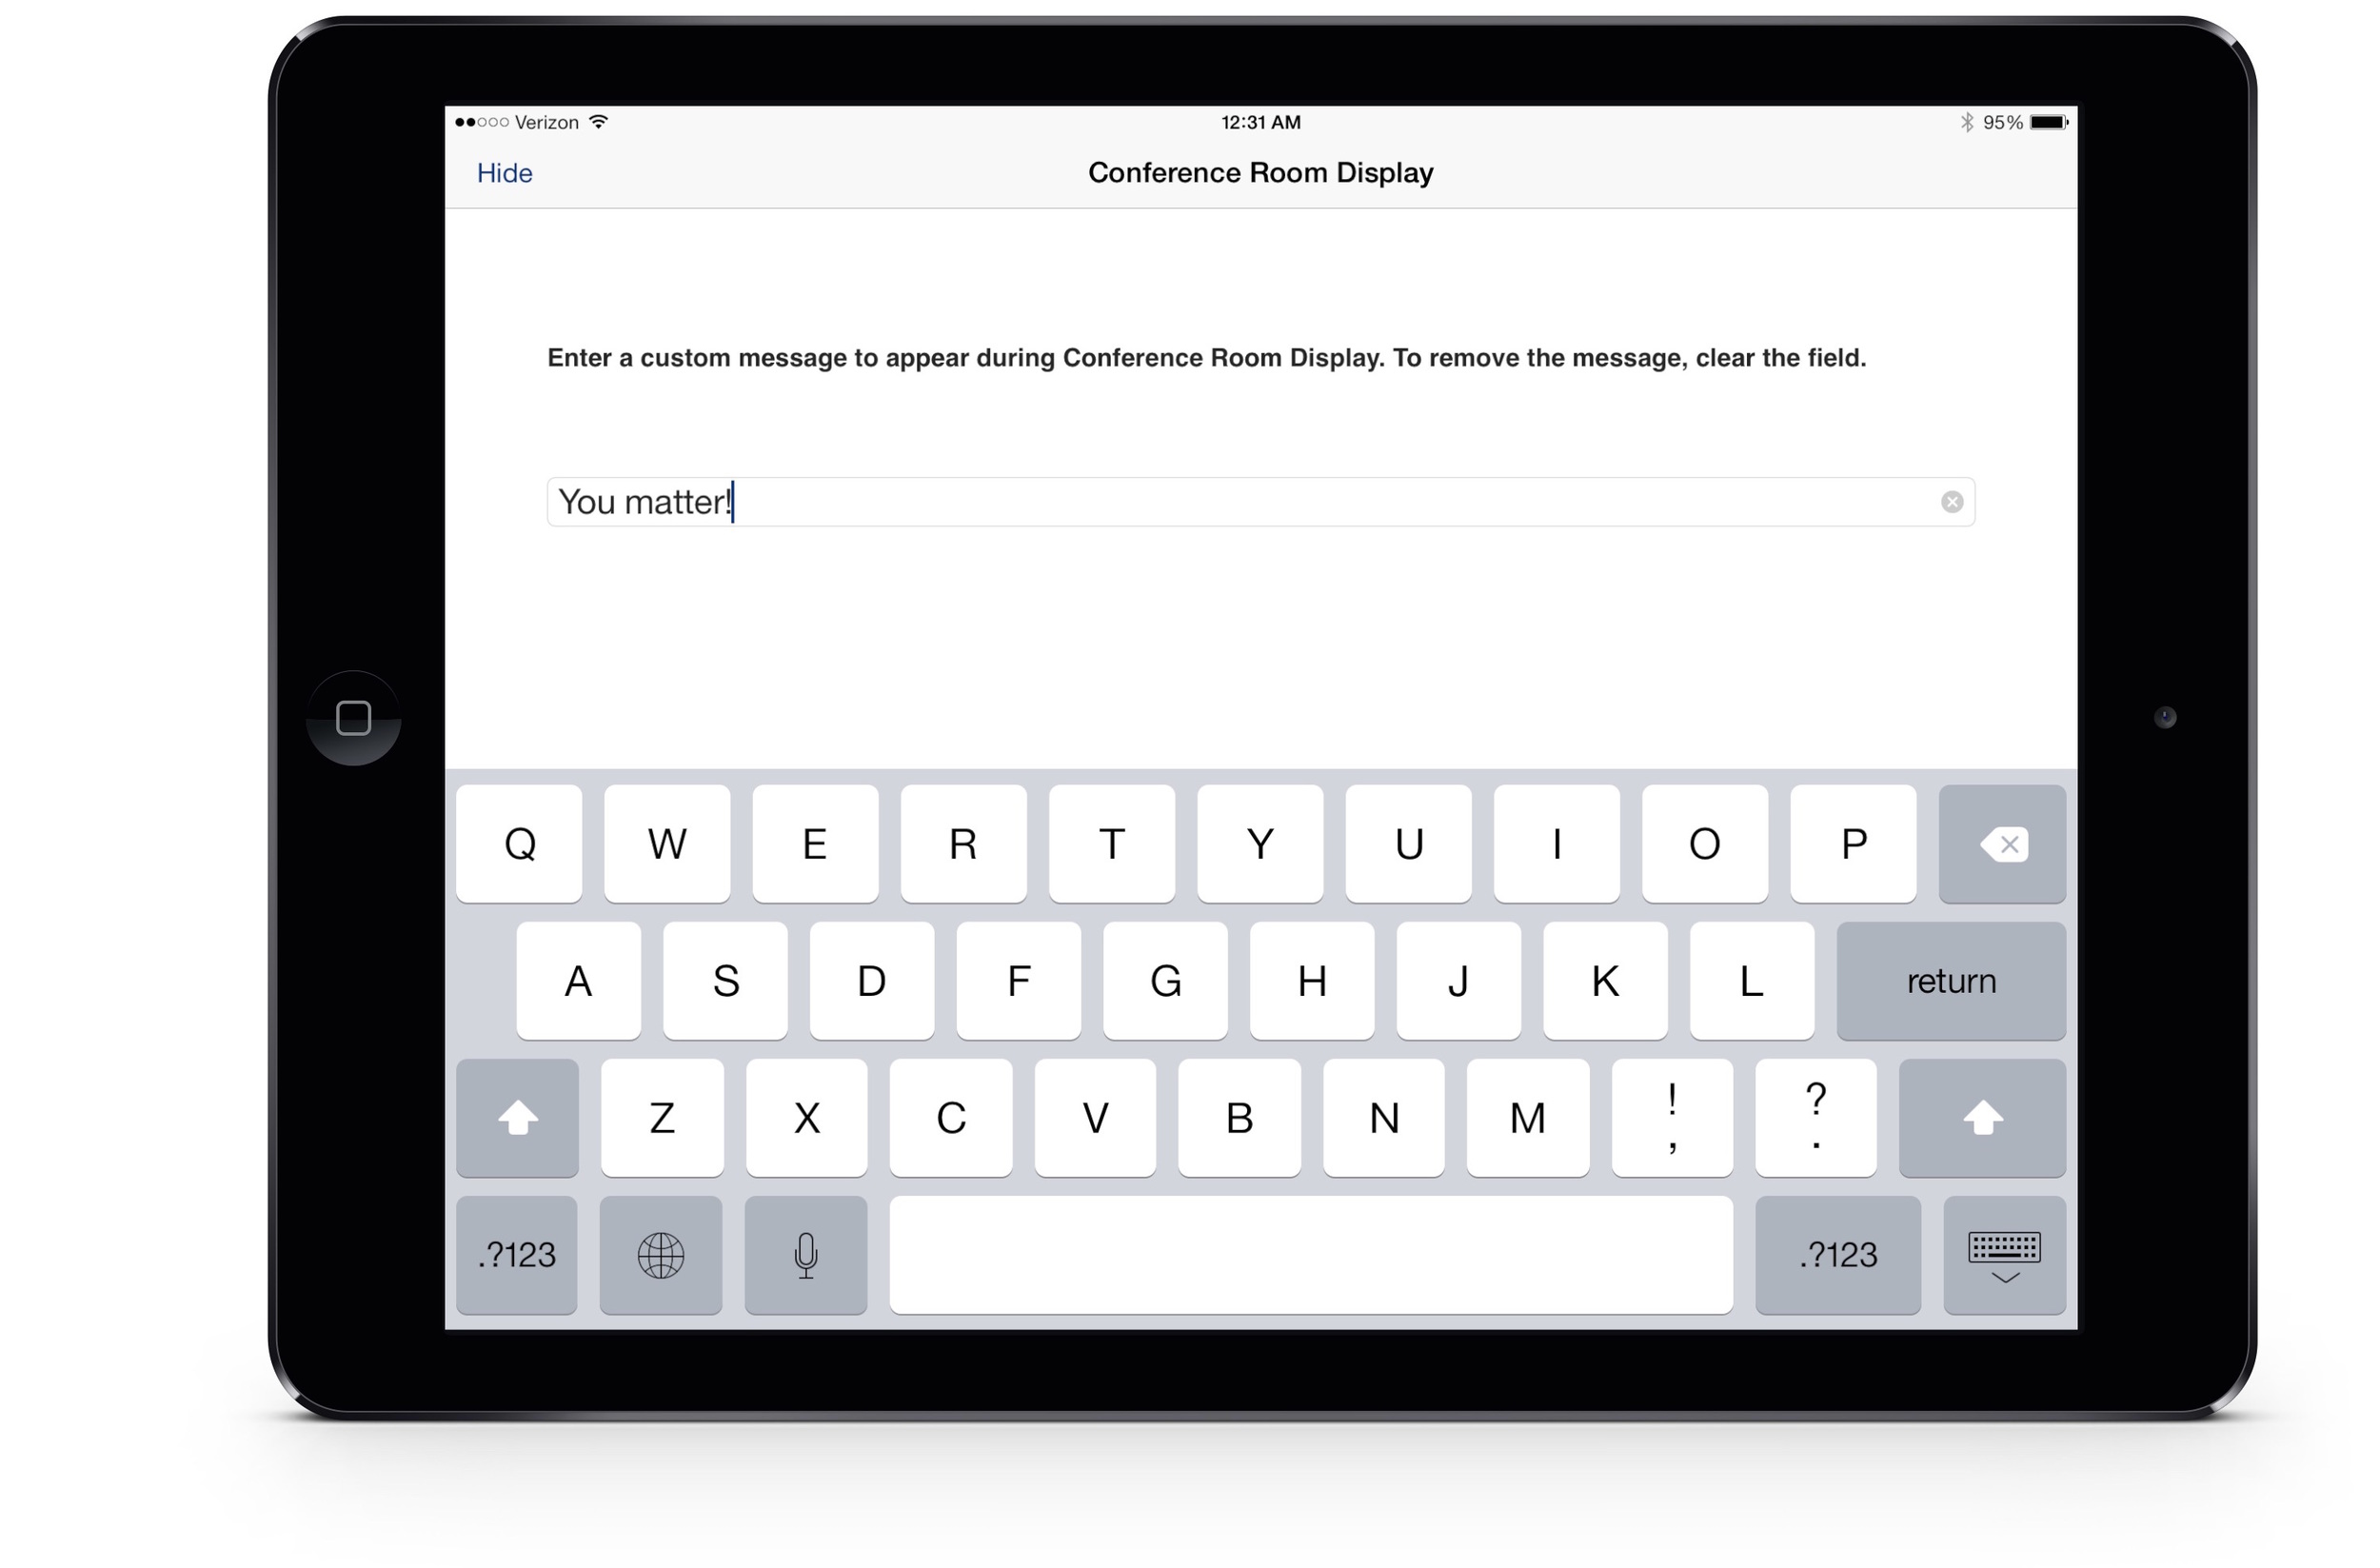
Apple TV has an option to turn on what’s called Conference Room Display. When not mirroring or playing content, Apple TV will show onscreen instructions for using AirPlay, including the Apple TV’s name. You have the option to display those instructions on top of your screen saver or alongside a photo of your choice.
If you’re using the screen saver as a bulletin board, you might not want to turn on Conference Room Display. The onscreen instructions will mostly likely obstruct the informational image it’s positioned on top of. Conference Room display takes up about a third of the screen. If you’re pairing it with a background photo, design your image accordingly.
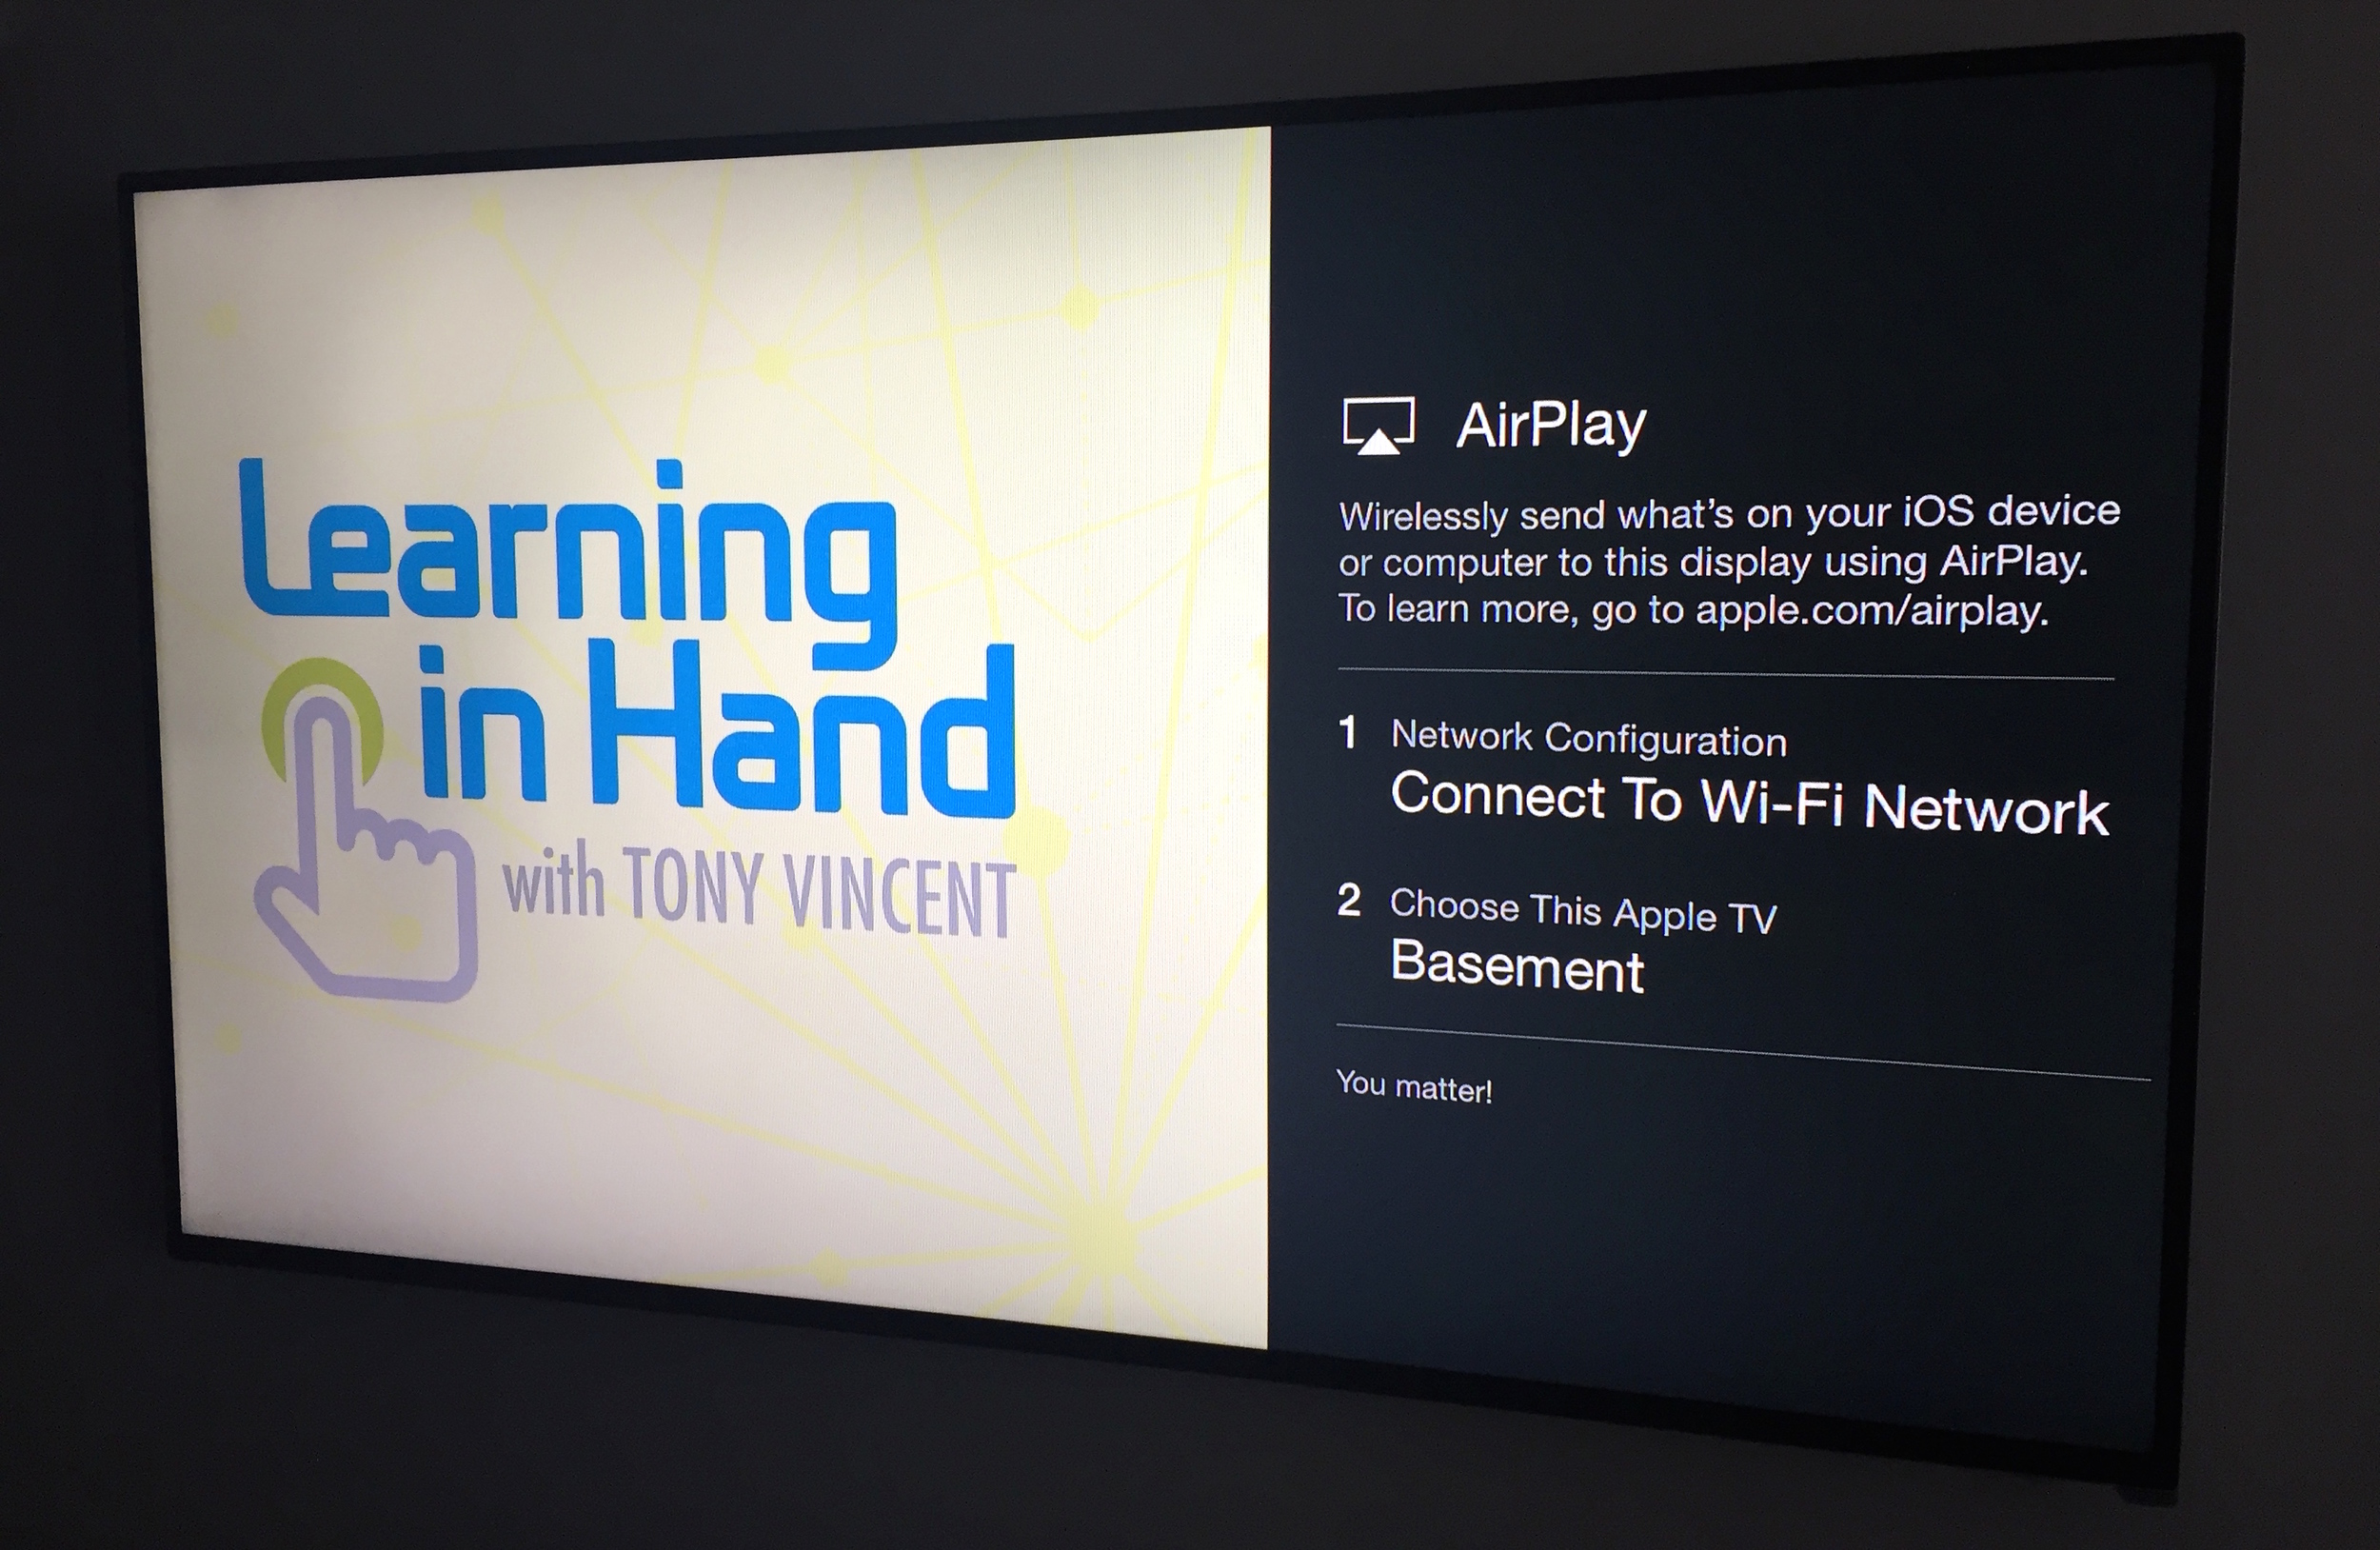
But, if you’re not using the screen saver, Conference Room Display is useful for letting others know the name of that specific Apple TV on your network. And if you have multiple Wi-Fi networks, Conference Room Display can indicate which hotspot the Apple TV is associated with. Note that if the Apple TV is using a wired network connection, Conference Room Display will not show Wi-Fi information.
You can set a Custom Message in the Conference Room Display settings. The message is kind of small, but it might be a great place to indicate any passwords or hints for connecting to Wi-Fi.
Use a Keyboard with Apple TV
Entering letters and numbers using Apple TV’s remote arrows is not fun. I suggest getting the free Remote app so you don’t have to arrow from character to character. The Remote app for iOS will display a keyboard on your iPad, iPhone, or iPod touch you can type on. It’s worth the time it takes to download the app and pair with your Apple TV for when you need to enter a passcode, account information, or custom messages.
The Remote app uses Home Sharing, which needs to be set up on the Apple TV and on the device on which you will use the Remote app. On Apple TV this involves going to Settings → General → Remotes → Remote App.
Don’t Get Hijacked
Be default, anyone on the same network can AirPlay to Apple TV. That’s fine in someone’s living room, but in a school, that means that others can send anything to the classroom’s screen, even people not in the same room. If unwanted images, audio, or video ever appear on your Apple TV, you can press the Menu button on its remote to stop AirPlay and return to Apple TV’s menu.
You have several options to protect your Apple TV from possible screen hijackers. These options are found by choosing AirPlay → Security in Apple TV’s Settings.
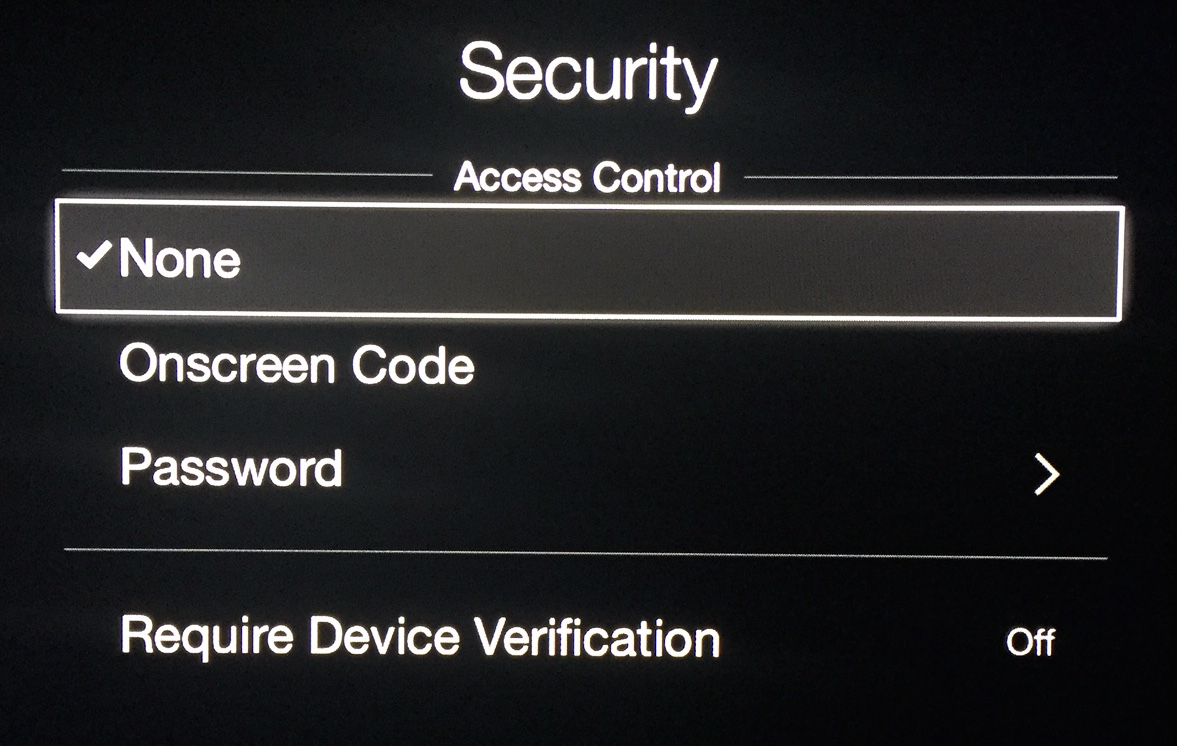
You can choose to set an AirPlay password. This password doesn’t have to be a strong one. In fact, make this password something really simple to enter. You can choose to share this password with your students, or, if you want them to AirPlay from their devices, you can enter it for them. Devices remember the password, so you can change the password periodically if necessary.
If the teacher is the only one using AirPlay, she can make the password a little more secure because it won’t be typed very often. Or, she could turn on Require Device Verification. With Device Verification turned on, Apple TV requires a device to be verified with a one-time onscreen code before it can use AirPlay.
If you just want to be sure that only devices in the same room as the Apple TV can AirPlay, consider turning on Onscreen Code. Each time someone choose to connect to Apple TV, a four digit code is displays onscreen and must be entered on the device before AIrPlay begins.

Take Up Your Whole Screen
If Apple TV is not taking up your entire screen or appears smooshed, try changing the TV Resolution settings. You can find these in Settings under Audio and Video. If you’re using a projector that is not widescreen, try changing the TV Resolution to 1024x768. This resolution might help make a mirrored iPad’s display appear larger. If your display doesn’t look right, try enabling Adjust for AirPlay Overscan.
If a mirrored iPad display does not fill your entire projector screen, try fiddling with the Aspect options on your projector. You might be able to stretch or zoom the screen to make the iPad’s screen larger.

If AirPlay Stops Being Nice...
AirPlay can be flakey. When you mirror an iPad to an Apple TV, sometimes the connection stops without any warning. This might be because of network issues, but I’ve had this happen on really good Wi-Fi networks. I can usually get the connection back quickly. Sometimes I might have to turn off my iPad’s Wi-Fi and turn it back on, or I might have to power down my iPad and power it back up. Or, I might have to restart the Apple TV by going to Settings → General → Restart. I’ve even had situations where I just cannot get AirPlay to resume.
It’s nice to have a backup for when you are having troubles mirroring to Apple TV. My backup plan is to connect the projector or television directly to your iPad using a VGA or HDMI cable and an adapter. Apple makes four different kinds of adapters, and you can use this chart to figure out which one is right for your setup.

Some Bullet Points About Apple TV...
- Get back to Apple TV’s Home screen easily by holding down the remote’s Menu button. This is much faster than backing out of layers and layers of menus.
- In order to AirPlay from a device, the Apple TV and the device must be on the same network. The exception is Peer-to-Peer AirPlay, but that’s only available to very new Apple TVs and very new devices.
- AirPlay doesn’t work on all Wi-Fi networks because it requires certain ports to be open.
- If you are missing some of the options I mention in this post, your Apple TV might need a software update. Go to Settings → General → Software Updates to get the latest update.
- Wire your Apple TV to ethernet if you have that option. It will put less strain on your Wi-Fi and you should get better mirroring results.
- You can lock Apple TV setting with a passcode you set in General → Restrictions. Any changes will require the passcode.
- Apple TV only has an HDMI connection out. If you want to use Apple TV with a projector that doesn’t have HDMI, then get an HDMI to VGA adapter like the Kanex ATVPRO.
- You don’t have to pay so much for an HDMI cable. Amazon and Monoprice have very inexpensive cables that work just as well as much pricier ones.
- Don’t have an Apple TV and want to mirror an iPad, iPhone, or iPod touch to a big screen? There are options, including wired and wireless solutions.
- If you have a large number of Apple TVs to set up, consider using Configurator. It runs on a Mac and allows for network and other settings to be pushed out to Apple TVs and other iOS devices.
- You and mirror or extend your Mac desktop (if it was manufactured in 2011 or after) to Apple TV. Older Macs can use AirParrot. It's $14.99 with a 7 day free trial.
- You can mirror a Chromebook to an Apple TV using the AirParrot Chrome extension. It’s $4.99 and has a 7 day free trial.
- You can mirror a PC to an Apple TV using AirParrot. It's $14.99 with a 7 day free trial.
- I’m still on the lookout for a convenient way to mirror Android to Apple TV.
- If you have an Apple TV and an iPad, you’ve got to try playing Sketch Party TV with your class. It’s a Pictionary-style drawing and guessing game. The app keeps score and tells you whose turn it is to draw. While it is advertised as a party game, teachers can input vocabulary words and play as a really fun way for the class to review.
Disclosure: Links to Amazon and iTunes are affiliate links and Learning in Hand may get paid a commission if you make a purchase.